Thursday, July 9, 2015

Tips for Buying Your First "Real" Bicycle

People oftentimes ask me for advice when it comes to purchasing a new bicycle.  


I usually preface what I say with, “Well I’m no expert, buuut…” And then I ask them a series of questions, many of which they’ll likely be asked by their potential bike store sales rep.

For what purposes do you intend to use your bike?

This is a big one because there is an array of bike styles to choose from, and you should be aware of your options.  


Road Bikes


If you plan on doing a lot of pavement riding, a road bike is the way to go. Here’s why:

  • These suckers are built for efficiency and aerodynamic riding. They are lighter in weight than mountain or hybrid bikes and have ultra thin tires to minimize friction/resistance on the pavement.  
  • They have drop-bar handlebars that put the rider into the best position for efficiency—offering an unparalleled variety of ergonomic hand positions, which is crucial for comfort on long rides. Cycling too long with your hands in a fixed position can cause nerve damage, which is no bueno.


Cannondale Synapse Carbon Women's 105 5 2015
Here's a photo of my sexy lady: a 2015 Cannondale Synapse Women's 105 5
Photo credits: bicycleranch.com


Mountain Bikes


If the off-road experience is more your jive, then this is the bike for you. Listen up:
  • These bikes are perfectly designed for rough, off-road trails. The tires are big with lots of tread so they can tackle the most rugged of surfaces.
  • They have shocks to absorb the sting of rocky riding, and to give you more control when climbing boulders and ledges (Because you can totally do that! Easy!). 
  • Unlike road bikes, these have flat or upright handlebars that promote stability and control on non-paved surfaces. The range of gears is lower, as well, making it easier to go up steep trails.

2015 Trek Fuel EX
Photo credits: trekbikes.com
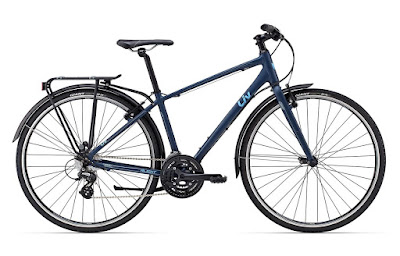
 

Hybrid Bikes


Want to meet somewhere in the middle? Here’s why this is the bike to choose:
  • Acting as a “hybrid” between a mountain and a road bike, this bike can be ridden on both paved and unpaved surfaces.
  • The tires have more tread than a road bike so it can handle unpaved bike trails, but not so much that it will slow you down on more smoothly paved streets.
  • The upright handlebars and wider seats promote a more leisurely ride than a road bike, making this a great bike for shorter rides through town or on the bike trail.
 
2015 Trek Neko S (I ride the 2013 model of this lady and love it)
Photo credits: trekbikes.com


City Bikes


Stickin’ to the city? Here’s why these bikes are great for your commute around town.
  • Much like the hybrid bike (for it truly is a type of hybrid), the features on this bike also meet half-way. Tires are smooth enough for the paved city streets, but durable enough for those rougher side streets. The thicker tread helps prevent flat tires as well (glass, debris, etc).
  • These bikes put you in a very casual upright position. Not meant for distance or speed, but comfort and ease!! You don’t need to change into biking gear to ride on one of these. 
  • Jeans work just fine, or slacks if you’re riding to the office.
  • Fenders, mud flaps and chain guards prevent you from getting dirty while you ride. This is important if you’re going on a first date. (dummy! Don’t ride your bike to a first date!) 
  • Front basket or rear saddle bags can easily be attached. Great for trips to the store or to class!

http://www.giant-bicycles.com/en-us/bikes/model/alight.city.2015/18611/76022/
2015 Giant Alight City
Photo credits: giant-bicycles.com


Unicycles


There are no practical uses for these. But if you have the skillz to ride one, by all means.

After you've determined what style of bike you want, the next important question is:

What's your budget?

Unless you're simply planning on riding your bike to the gym and back and nothing beyond, I highly recommend you set aside at least $400–$500 dollars to find yourself a durable machine that will fit your body and your needs. 

However, the more you can set aside, the better. Bike quality is based largely on the make-up of the machine—frame material, components, tires, etc. Newer models of some the more popular bike brands, such as Trek, Cannondale, Giant and Specialized, generally start at about $600 and can get as high as $3,000. I always encourage people to keep an eye out for sales. Plus, many bike shops have a clearance section for their "older" models, i.e., a new model of the same bike was released, and they're trying to ween out the models from the previous year. 

A Few More Words of Advice


Make sure you test ride several bikes. 
One size/style does not fit all! You need to find what works with your body and your riding style. If your wrists, elbows, neck, etc. are in pain within 5 minutes of riding, it's probably not the right bike for you. Just know there is one out there for you—you just have to find it! 

Plan to purchase some accessories.  
You're going to also need the following items:
  • Helmet ($40–$100)
  • Lights—front & rear ($30)
  • Bike shorts—you're going to want these if you plan on doing any rides over 10 miles. Trust me when I say saddle soreness if not fun! ($50–$120)
  • Water bottle cage ($15–$25)
  • Chain lube ($5)
  • Bike pump ($25–$50)
  • Spare bike tubes ($20 for a 3-pack)
 
By the time you're all done bike/accessory shopping, hopefully your smile will be just as big as mine was.

Happy bike shopping! Cheers!

Wednesday, July 8, 2015

The Dangers & Glory of Living 164 Feet from Amsterdam Falafel & Kabob

I'm convinced that every evening between about 5 and 9 p.m. Amsterdam Falafel & Kabob purposefully sends that heavenly curry scent through an invisible tunnel beelined straight for my doorstep.


Until the day arrives where we can embed smells into blog posts, a photo will have to do. I mean, look at those fries and all their curry-dusted glory. Just look at 'em! Bypass the Catsup, and dip them into a side of mayo for an extra aphrodisiac-like (or European) experience.


Photo credits: facebook.com/pages/Amsterdam-Falafel-Kabob
And the curry fries are just the beginning.

Scan Amsterdam's chalkboard menu, and you'll only see a handful of items listed, but they're all solid choices. If you're a vegetarian (or if you're not) the falafel sandwich is a zero-contemplation decision. Amsterdam loads a thick round of grilled telera bread with two large fried chickpea balls, bright purple pickled cabbage, minced garlic, uncooked chickpeas, cucumbers and tomato. If you think it will fit, you can add some diced feta to the mix for an extra charge.

The same delicious bread and "stuffing" technique are used for the falafal's carnivore-counterpart—the Döner kabob sandwich. Endless shavings of ultra-tender, generously-seasoned lamb meat infiltrate every succulent bite. Despite its girth, your stomach always finds a way to make some extra room to take this bad boy down.

While the falafel and kabob sandwiches are both fit for a king as they are, one must ask herself, What king doesn't prefer living beyond his means? That's where the house-made sauces come in. Every time you order a sandwich, you'll be asked if you would like any sauce, and you can choose from three kinds: green herb, creamy garlic or spicy. I love me some zing, but I prefer the garlic and herb combo. This way, there's nothing to overshadow the already flavor-booming chickpea rounds or thick lamb slices.  

Me + Amsterdam falafel sandwich
Getting ready to throw it down with my falafel
sandwich and little hummus plate. I crushed it!
If you're hungry but not that hungry, you can always order a half sandwich or get yourself a falafel/kabob salad—everything's the same here, only your mounds of goodness will lay over a bed of leafy greens instead being nudged inside a vessel of chewy bread. 

I oftentimes also order the hummus plate. Amsterdam's creamy, garlicky, homemade hummus is like none I've ever had before. The foil-wrapped pieces of pita-like bread it comes with always taste freshly baked, too. And unless you're dousing your bread slices with it, chances are you'll have some leftover hummus to take home.

Though an Omaha staple for years, a second location recently opened up in Lincoln. If those of you in the area have not yet been, I highly encourage you to make the trip soon. You'll be hard-pressed to find another place where you can get this much bang for your buck.

Cheers!


Tuesday, July 7, 2015

How to Prevent Common Running Injuries

A few days ago I was nudging at you all to start running. Or at least to think about starting running.


Whether you've officially started or are still in the contemplation phase, today's post could be of some use to you. It's all about preventing injury—something all runners should take seriously, especially those just starting out.

I should mention that I am currently injured and should probably listen up too.

Below I have outlined eight of the most common running injuries that plague those who hit the pavement, along with a few ways to stop or lessen the pain. 

The Injuries 


1. Runner's knee
 

According to competitor.com, Patellofemoral pain syndrome—otherwise known as anterior knee pain and runner’s knee—is the most common running injury. Pain is generally below or behind the kneecap and caused by repetitive and intense impact with the pavement. While it might give you a breather, downhill running is a major culprit of runner's knee. You're better off sticking to flat or uphill terrain. To treat the pain, experts suggest taping your knee or using a knee brace, taking anti-inflammatory medications, and (the one I'm not so good at) cutting back on mileage.

2. Achilles tendinitis

I've never experienced this one (knock on wood). The swelling of the Achilles, the tendon that joins the calf muscles to the heel bone, can be caused by running too hard for too long, by not weraring the proper shoes, or even from having a naturally flat foot. A couple of easy solutions: make sure to stretch them calf muscles after every run, take some anti-inflammatories (ibuprofen is my BFF), and consult with a running expert, i.e., credible shoe salesman/woman at Scheels who can fit you for the proper footwear. Also, I know I just got done advocating the uphill terrain, but too much climbing puts extra stress on tendons. So, like anything in life, balance is key!

3. Shin splints 

Most of you have probably experienced that unruly stabbing sensation in your shins at some point or another. And if not, well then aren't you just perfect. Or at least damn lucky. Among the most irritating of injuries, shin splints refers to the pain along the shinbone (tibia) and usually occur  when the muscles, tendons and bone tissue become overworked by increased activity (are you seeing a trend here?). To stop the stabbing, try lower impact workouts (walking, cycling, swimming), put a bag of frozen peas on the inflamed area for about 15–20 minutes, and have some ibuprofen (or anti-inflammatory of your choice) on hand. Once again, properly fit shoes can help prevent shin splints, as well simple stretching exercises

4. Iliotibial band syndrome

This is what I have, and man is it the pits. The iliotibial (IT) is the ligament that runs down the outside of the thigh from the pelvic bone and attaches to the knee to help stabilize and move the joint. ITBS occurs when the IT band is tight or inflamed due to increased mileage (as was the case for me), downhill running or weak hips. IT band pain can be severe enough to completely sideline a runner for weeks (I just shed a tear), or even longer (I just shed two tears). Specific stretches, along with foam rolling, taking a few days off from running (this is always hard for me), decreased mileage (I advise no more than 2–3 miles at a time), will help reduce the pain and inflammation.​

5. Stress fracture

One would think she would know when she has a broken bone, but stress fractures are annoyingly devious. These tiny cracks in the bone are caused by the continual pounding of the foot while running. Runners can get a wide variety of stress fractures, but the most common locations are the tibia, the metatarsals (foot), the femur (thighbone), the fibula (calf bone) and the navicular (middle of foot). If you think you have a stress fracture, meet with a podiatrist or orthopedist who can diagnose the location and severity of your injury. Time off, cross-training and eating calcium-rich foods will speed up your recovery. 

6. Pulled muscles

When a muscle is overstretched, overused or not properly warmed up, fibers and tendons can tear and cause a pulled muscle. While the pain persists, lay off running for two to five days, and stick to gentle stretching and icing the muscle. To prevent a pull, make sure you do a proper warm-up (I recommend 50 jumping jacks, 25 lateral lunges and 3–5 minutes of dynamic stretching.

7. Blisters

Blisters were my arch nemesis for many years, but I've learned several tips for both preventing and soothing the pain of these nasty, fluid-filled skin bubbles.  First, make sure you're wearing a properly fit shoe (can't stress this enough) and a good pair of synthetic socks . If a blister still appears, you can use a good old Band-Aid to cover it, or, after cleaning it, apply a small amount of super glue and spread it around the blister. Once it dries, it forms a synthetics "replacement skin" and significantly lowers the pain level (so you can keep on running!). 

8. Side stitches

I think I might be getting one just typing about it. Side stitches, formally referred to as exercise-related transient abdominal pain (ETAP), are similar to shin splints in that the majority of runners have at some point experienced them. Many experts believe the pain is caused by the diaphragm beginning to spasm from being overworked and suggest poor running posture could be to blame. If the stitch hits, try bending forward and tightening your core or taking deep breaths and exhaling with pursed lips. 

That sums up today's lesson on common running injuries. I certainly learned a new thing or two, and I hope you did, too!

Cheers to injury-free running!

Monday, July 6, 2015

Register's Annual Bike Ride Across Iowa (RAGBRAI)

It was summer 1973. 

John Karras
John Karras
Photo credits: ragbrai.com

John Karras, an avid bicyclist and writer/copy editor for The Des Moines Register suggested that his colleague and fellow cycling enthusiast Don Kaul ride his bike across Iowa and write about the experience in the Register’s “Over the Coffee” column. After a little coaxing, Kaul convinced Karras to accompany him for the journey, and, in a matter of a few weeks, nearly 300 more Iowan cyclists also signed on for the ride. At the time, no one imagined  the ambitious bike ride across their home state would become the longest, largest and oldest bicycle touring event in the world.


My First RAGBRAI Experience 

Fast-forward to July 23, 2013. Here I was, a total RAGBRAI rookie, oozing with nerves and excitement about the seven days and 435 miles that lay ahead. Good thing I was recruited by a very seasoned group of riders (some with more than 20 RAGBRAIs under their belts) who could show me the way. 

RAGBRAI 2013 Ready to Head Out for Day One
Chris & I about to head out for Day 1 of RAGBRAI 2013.
Our group, the Pahaffey Riders, consisted of about 15 cyclists, most of whom were relatives of my now husband. We were fortunate to have an RV where we could stow all of our camping materials and personal belongings while we rode all day. After meeting back up with the RV at the next overnight town, we would pitch our tent, shower (usually in a high school locker room, though hog trailors and car washes are also standard options), eat a carb-heavy dinner and socialize with the gang before heading off to bed.

Each day, I grew more and more mesmerized by Iowa’s beautiful scenery, rolling hills and quaint little towns that greeted us with open arms. The route varies each year, but the halfway and overnight towns are generally thrilled to host “the party.” With more than 20,000 cyclists biking through towns of 1,000 residents or fewer, a single day of RAGBRAI generates more revenue in food sales and lodging than in all of the remaining days of the year combined. 

RAGBRAI Campers 2014
RAGBRAI riders set up their tents on a baseball field in Rock Valley July 19, 2014.
Photo credits: Zachary Boyden-Holmes/ Juice


The People Watching
 

Like any major event, RAGBRAI is a true spectacle. Countless times throughout the day, you’ll pass by the most unimaginable sights: recumbent bikes that depict bananas and space shuttles, unicyclists, families riding single-file on a hex (six-seated) tandem bicycle, and there’s typically at least one really crazy person who will run the whole thing. And heck, there's even a fair chance you'll bump tires with Lance Armstrong.

Lance Armstrong Thanks Mr. Porkchop RAGBRAI 2014
Lance Armstrong personally thanking Mr. Pork Chop
(Paul Bernhard) for all of his work on RAGBRAI
over the years.

The Food 

I can’t talk about RAGBRAI without mentioning the conglomerate of exuberant foods. Between the hearty breakfast wraps from Farm Boys, made-to-order flapjacks from Chris Cakes, ice cream made on location by the cream-churning elves at Beekman’s, and the ghastly large serving of “the other white meat” from Mr. Porkchop, riders have no trouble re-energizing throughout the day.   

The Anticipation of RAGBRAI XLIII 

Less than two weeks away, I am eagerly awaiting for RAGBRAI XLIII to begin! This year,
the route
starts on July 19 in Sioux City and ends in Davenport on July 25. The average daily distance is 69 miles, and the gain in elevation for each day ranges from 1,308 to 3,941 feet. For a little extra challenge, my husband and I will also complete the Century Loop, known since 2001 as the Karras Loop. This optional route extension, offered typically on the highest-mileage day, tacks on the appropriate amount of distance for the route to equal an even 100 miles. Riders who complete the loop receive a special patch of honor.


RAGBRAI 2013 Tire Dip
Me completing my tire dip in the Missouri River, a tradition
for RAGBRAI riders who make it through to the end.
All that said, RAGBRAI is a casual, self-paced, family-friendly event. You do not have to be a semi-pro cyclist to participate. In fact, many riders opt to bike two or three days versus all seven, and some ride half days to shave off some mileage. The point is, it’s a ride; not a race. Sure, the biking is the focal point, but the people you meet, places you visit and memories you make along the way are the true essence of what makes RAGBRAI, well RAGBRAI.

Cheers!

Saturday, July 4, 2015

Today Is the Biggest Beer Drinking Day of the Year

I love the Fourth of July. 


  1. It marks one of the most monumental days in U.S. history.
  2. It's during my favorite season.
  3. Family & friends are abound.
  4. BBQs & yard games.
  5. Pretty lights exploding in the sky.

Oh, and it's also the biggest beer drinking day of the year. 


According to my mother-in-law. Who found this out while watching the "Today" show. 

I did a little more investigating (not because I doubted my MIL) because I am a hard-core fact-checker. 

Low and behold, my mother-in-law was right (just as I knew she was!). 

According to Fortune magazine, last year consumers spent nearly $300 million more on beer for the Fourth of July than they did for the Super Bowl. Yowsers!

What I'd like to know is how much of this beer consumption was comprised of macro domestics (Budweiser, Coors, Miller, Busch, etc.) versus craft beers. 

Before I go any further, I am by no means knocking domestic beers. Heck, you can't get much more patriotic than a tallboy of Pabst Blue Ribbon!

Buuut, if you're contemplating stashing your cooler with something a little different this year, I do have some recommendations—all of which can be found at your local bottle shops and grocers.

Before we jump into it, you should be familiar with the a couple of key acronyms commonly found on craft beer labels.


ABV

Alcohol by volume is a percentage that simply let you know how much of your beer is alcohol, versus other "stuff" like water and adjuncts. The ABV for light, session beers, i.e., beers that won't get you feeling all loosey goosey after you've had two or three, range from 3–5%. Sipping beers, i.e., beers meant to be drunk slowly and not in threes or fours, typically range from 7–14%, thought barrel-aged beers can convert even higher. These are what I call my "dessert beers," as they make for the perfect night cap. 


IBU

International bitterness units measure how hoppy your beer is on a scale of 0–100. The florally, citrusy, piney, grapefruity flavors hops exude start to become notable in beers with 35 IBUs or more. Some, like Dogfish Head's 90-Minute IPA can reach upwards of 90 IBUs or greater. These "imperial" IPAs are commonly referred to as palate wreckers. 

New & Light Craft Beers to Try This Fourth of July


Lagunita's Daytime Fractional IPA

Lagunitas Daytime IPA 

ABV: 4.65%

IBU: 54.20


If you fancy India pale ales or have an interest in trying them out, either way, the Lagunita's Daytime IPA is a definite go-to option. This is a fractional IPA, meaning it has a lighter mouthfeel (due to a lower ABV) but still makes way for the hop-forward flavors of lemongrass, grapefruit and a hint of citrus to shine. An excellent choice for an easy-drinkin' IPA.

Photo credits: lagunitas.com


Rogue Hazelnut Brown Nectar

Rogue Hazelnut Brown Nectar 

ABV: 5.6%

IBU: 33


If you can't hang with the hops and prefer sweeter, maltier beers, I can assure you will not be let down with Rogue's Hazelnut Brown Nectar. This lightly sweetened and nutty brown ale gives off subtle hints of chocolate and coffee. Its medium body, dark amber color and slight roastiness all complement one another. 

Photo credits: rogue.com


Peace Tree Brewing Co. Sidekick Kolsch

ABV: N/A

IBU: N/A


Summer is the time to drink this beer. Its golden color, slightly sweet aroma, intense crispness, frothy head and dry finish make it pretty irresistible. Though the ABV and IBUs are not listed, I can vouch that this beer is extremely light with little to no hop character. It's delicate and refreshing, and it even comes in a can, making it a prime choice for your Fourth of July BBQ.

Photo credits: peacetreebrewing.com


Oskar Blues Mama's Little Yella Pils

Oskar Blues' Mama's Little Yella Pils

ABV: 5.30%

IBU: N/A


Another great summer session beer, this pilsner is well-rounded with a nice, slight hop presence. It's tingly on the tongue, light on the palate, and has a thick white head that will leave you with one badass foam stache. Get your koozies ready—this beer is the perfect pairing an afternoon lounging session on a hot July day.

Photo credits: brew.oskarblues.com


Zipline Copper ALT

Zipline Brewing Co. Copper ALT

ABV: 5.20%

IBU: 26


I had to throw at least one local beer into my list of recommendations. Created by the beersmiths at Zipline Brewing Co. in Lincoln, Neb., the Copper ALT stands by its name. Its bronze hue and half lager/half ale compositions make it a true depiction of an altbier (German hybrid). In every sip, you'll happily greet mild flavors of chocolate and hazelnut—a winning combination in my book. 

Photo credits: ziplinebrewery.com

If you have any other go-to summer beers, I'd love to hear what you recommend! Post in the comments box below for all to see.

Cheers to freedom & beers!

Thursday, July 2, 2015

Thursday Taco Ride

At about this time four years ago, I experienced my very first Taco Ride.

For those of you who are unfamiliar, the Taco Ride is the longest running weekly bicycle ride in the U.S. Upwards of 2,000 cyclists make their way up and down the Wabash Trace Nature Trail every Thursday—or at least every Thursday that calls for mild and dry weather. 

The 10-mile leisurely jaunt each way includes several opportunities to stop and rest, including the legendary Margaritaville. About six miles into the ride, cyclists pull over to this designated pit stop, which is lined with bike racks and benches to accommodate a large crowd.

Most Taco Riders will crack open a beer, but a small percentage of truly devout ones will go to the extent of bringing a blender and fixins to mix up their own iced margaritas. 

Why Thursday, you ask? 

When the Taco Ride originated, bikers would begin at the trailhead near Lewis Central Middle School in Council Bluffs, Iowa and ride nearly 15 miles to Silver City where they would break for the Thursday night taco special. When the Silver City bar closed a few years later, the Point B destination was changed to Tobey Jack's Steakhouse in Mineola, a shorter ride that helped draw more riders.

What didn't change was the food. The majority of riders opt for the six-pack and a pitcher special, but the real (and far cheaper) way to go is with the Walking Taco. For $5, you get an individual-sized bag of Doritos loaded with all of your basic taco fixins. Sure, the copious amounts of sodium will send your blood pressure through the roof and give you a bit of bloat belly, but I just make sure to drink about nine bottles of water when I'm finished, and I'm typically fine.

Anyhow, you don't do the Taco Ride for the sub-par tacos—you do it for the ride! The laxed environment, friendly people scenic ride on that crushed limestone trail are the true reasons one should experience a taco ride. 

Tips for first time Taco Riders

Always bring:
  • Helmet (I'm a stickler on this)
  • Bike lights (it gets dark on the ride back)
  • Water/sports drink (and beer)
  • $1 per rider (to tip the volunteers at the trailhead)
  • Bug spray (mosquitoes like sweat & tacos)
  • Credit/debit card & ID (to pay for food & drinks)
  • Extra bike tube (I have yet to get a flat, but always be prepared)
  • YOUR BIKE
  • YOUR FRIENDS
  • YOUR WILD SIDE
  • And leave your worries at home
Below are a few photos from my own personal Taco Ride adventures. If you have any interest in going on one, reach out to me. I'd love to answer any more questions you have and would always be up for some new people to join our group!

Cheers!


Stop at MargaritavilleTobey Jack's Mineola Steakhouse

Wet & Muddy Thursday Taco RideStop at Margaritaville

Wednesday, July 1, 2015

How Beer Is Made

The way I typically describe making beer to people is that it is, quite arguably, one of the simplest and most complex things you could ever do.

But have no fear—it brings so much cheer!

Today, I will walk you through the process of making beer for a commercial craft brewery. The homebrewing process is slightly different, due to being on such a smaller scale, but, all in all, the fundamental steps are one in the same.

Rather than getting all nerd-o scientific and talk about enzymes and isomerization and all that jazz, I'm going to keep this pretty basic.

Grab a beer, and let's begin.

To start, take a look at this lovely infographic, which illustrates the essential steps of a typical brewing process. 


Now, let's walk through each of those adorable little graphics, shall we.

MILLING + MASH TUN
Before you can use your malted barley—or unmalted barley adjuncts like wheat, rice, oats, and rye—you must first grind (or, as many beer brewers like to refer to it, "crush") it. This step entails pouring your grain into a mill that grinds it up into tiny pieces, exposing all of the inner starches, sugars and enzymes locked deep inside each solid piece of grain. Homebrewers without their own mills can have their grains crushed at a local homebrew supply store. Once fully milled, the grain is referred to as malt grist.

Next, you will combine the malt grist with water into a mash tun, which is virtually an insulated vessel that can maintain a constant temperature. Over a period of 45 minutes to an hour, the starches in your crushed grains will convert into sugars necessary for fermentation.

LAUTER TUN
Now it's time to separate the sweet liquor from the spent grains. Some mash tuns are designed to include what is known as a "false bottom." The false bottom sits approximately 1–2 inches above the bottom of the mash tun and acts as a strainer. The act of separating the sweet liquor, known as "wort" (I know, a little weird, right?) from the mash is called "lautering."

BREW KETTLE
Once all of the wort has been extracted, it needs to be transferred into a stainless steel brew kettle. On a commercial scale, brew kettles can hold up to 5,000 gallons. Boiling serves three functions:
1. To sterilize the wort.
2. To concentrate the wort to the desired specific gravity.
3. To extract oils from the hops that are added at various times throughout the boil. 

WHIRLPOOL
After boiling your wort for about 60–90 minutes, we need to do our best to separate it from all of the hop resins that have settled to the bottom of the brew kettle, which is known as the "trub." To do this, we pump the hot wort into the whirlpool vessel at rapid velocity to cause the wort to start spinning like a whirlpool. This pumping process lasts for 10 to 20 minutes. The wort can now be easily separated from the pile by pumping it out of an outlet located on the side of the vessel.

HEAT EXCHANGER
The heat exchanger is a series of stainless steel plates and rubber gaskets pressed close together. The plates form two labyrinthine passageways—one for cold water, and one for hot wort. Cold water runs in one way and out the other way; hot wort runs in the other way and out one way. As they pass each other against the plates, the wort cools down and the water warms up.   

FERMENTATION TANK
Here is where all of the magic happens. Once your wort is cool enough—typically around 60–80 degrees, it's time to transfer it into the fermentation tank (or carboy or bucket for homebrewers). Then, it's party time. Pitch your yeast, and, within about 12–24 hours, those raging antibodies will begin to gobble up every last bit of that sweet, syrup-like substance and burp it back out in the form of alcohol and CO2. These yeast are marathoners, not sprinters, so give them two or three weeks to finish their job. 

FILTER
Once the yeast is done doing its thang, it doesn't just magically disappear. Most of it settles to the bottom of the fermentation tank, but some of it will float around like an overgrown man with floaties at the wading pool. So, unless you like snowflake beer (or Hefeweizens), you're gonna need to clear that crap out with a filtering mechanism. 

BRIGHT BEER TANK
A bright tank is the vessel beer is placed in after primary fermentation and filtering so it can further mature, clarify and carbonate, as well as be stored for kegging, bottling, canning and packaging. In brewpubs, bright beer tanks can even do double-duty as serving vessels. Shazam! 

BOTTLING + KEGGING
Alas, we made it to the final step. Once the beer is nice and conditioned, we can either bottle it up and distribute it for shelf space at designated bottle shops and grocery stores, or we can keg it and serve it on tap. Either way, after all of that love, sweat and beers you exhausted while making it will surely result in one tasty libation.

Cheers!